Using Class and New in CForms
- TARGET-AUDIENCE: *beginner*
- COCOON-RELEASES: 2.1.7
- DOCUMENT-STATUS: *draft*
What you will get from this page
An understanding of the more complex types of form that can be built with Cocoon.
Your basic skills
An understanding of building simple form model, template.
Technical prerequisites
Ideally a working forms+flow sitemap in which to experiment.
Links to other information sources
page metadata
- AUTHOR: AndrewSavory
- AUTHOR-CONTACT: andrew@luminas.co.uk
- REVIEWED-BY:
- REVIEWER-CONTACT:
It is possible to build complex forms using the <fd:class/> widget.
<fd:class/> is a meta-widget, which can be constructed from one or more existing widgets.
<fd:new/> is an instance of the meta-widget, where you are actually using it.
Consider the following basic form:
<?xml version="1.0" encoding="UTF-8"?>
<fd:form xmlns:fd="http://apache.org/cocoon/forms/1.0#definition"
    xmlns:i18n="http://apache.org/cocoon/i18n/2.1">

    <fd:widgets>

        <!-- A basic text widget -->
        <fd:field id="basic-text" required="true">
            <fd:datatype base="string"/>
            <fd:label>Basic Text Widget</fd:label>
        </fd:field>

        <!-- Basic cancel/submit -->
        <fd:submit id="ok" action-command="ok" validate="true">
            <fd:label>Submit</fd:label>
        </fd:submit>
        <fd:submit id="cancel" action-command="cancel" validate="false">
            <fd:label>Cancel</fd:label>
        </fd:submit>

    </fd:widgets>
</fd:form>
... and an accompanying template:
<?xml version="1.0" encoding="UTF-8"?>
<document
    xmlns:ft="http://apache.org/cocoon/forms/1.0#template"
    xmlns:fi="http://apache.org/cocoon/forms/1.0#instance"
    xmlns:i18n="http://apache.org/cocoon/i18n/2.1"
    xmlns:jx="http://apache.org/cocoon/templates/jx/1.0"
    >

    <body>

        <ft:form-template action="" method="POST">
            <ft:continuation-id/>

            <!-- Use the basic widget -->
            <p><ft:widget-label id="basic-text"/>: <ft:widget id="basic-text"/></p>

            <p class="form-buttons">
                <ft:widget id="cancel"/>
                <ft:widget id="ok"/>
            </p>

        </ft:form-template>
    </body>
</document>
To create a very basic meta-widget, we need to add a definition to the model:
<!-- A class widget -->
<!-- This defines a meta-widget "basic-class-text" -->
<fd:class id="basic-class-text">
    <fd:widgets>
        <fd:field id="class-text" required="true">
            <fd:datatype base="string"/>
            <fd:label>Class Text Widget</fd:label>
        </fd:field>
    </fd:widgets>
</fd:class>
In order to use this definition, we also need to instantiate it within the model. We do this as follows:
<!-- Instantiate the widget -->
<fd:new id="basic-class-text"/>
In our template, we first need to define how the meta-widget should be displayed:
<!-- Define the *template* for our meta-widget -->
<p>
    <ft:class id="basic-class-text">
        <ft:widget-label id="class-text"/> : <ft:widget id="class-text"/>
    </ft:class>
</p>
... and then we use it in the template as follows:
<!-- Use the meta-widget -->
<ft:new id="basic-class-text"/>
More complex meta-widgets can be built up. For example, a meta-widget with two text fields:
<!-- A class widget -->
<!-- This defines a more complicated meta-widget "complex-class-text" -->
<fd:class id="complex-class-text">
    <fd:widgets>
        <fd:field id="complex-class-text-one" required="true">
            <fd:datatype base="string"/>
            <fd:label>Complex Class Text Widget One</fd:label>
        </fd:field>
        <fd:field id="complex-class-text-two" required="true">
            <fd:datatype base="string"/>
            <fd:label>Complex Class Text Widget Two</fd:label>
        </fd:field>
    </fd:widgets>
</fd:class>

<!-- Instantiate the widget -->
<fd:new id="complex-class-text"/>
... and is used in the template as follows:
<!-- Define the *template* for our complex meta-widget -->
<p>
    <ft:class id="complex-class-text">
        <ft:widget-label id="complex-class-text-two"/> : <ft:widget id="complex-class-text-two"/><br />
        <ft:widget-label id="complex-class-text-one"/> : <ft:widget id="complex-class-text-one"/>
    </ft:class>
</p>

<!-- Use the complex meta-widget -->
<ft:new id="complex-class-text"/>
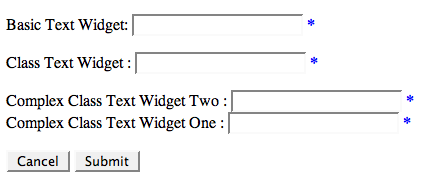
The output of this looks something like the following screenshot:
To bind this form to an XML file is simple. Given an XML file as follows:
<?xml version="1.0" encoding="UTF-8"?>
<data>
    <basic-text>test basic</basic-text>
    <class-text>test class</class-text>
    <complex-class-text-one>complex one</complex-class-text-one>
    <complex-class-text-two>complex two</complex-class-text-two>
</data>
The binding file would look like this:
<?xml version="1.0" encoding="UTF-8"?>
<fb:context
    xmlns:fb="http://apache.org/cocoon/forms/1.0#binding"
    xmlns:fd="http://apache.org/cocoon/forms/1.0#definition"
    path="/data"
    >

    <fb:value id="basic-text" path="basic-text"/>

    <fb:class id="basic-class-text">
        <fb:value id="class-text" path="class-text"/>
    </fb:class>

    <fb:new id="basic-class-text"/>

    <fb:class id="complex-class-text">
        <fb:value id="complex-class-text-one" path="complex-class-text-one"/>
        <fb:value id="complex-class-text-two" path="complex-class-text-two"/>
    </fb:class>

    <fb:new id="complex-class-text"/>

</fb:context>