Cocoon and Eclipse
This page describes how to debug Cocoon in Eclipse (as at 31 May 2005 with BRANCH_2_1_X and Eclipse 3.0.2).
I use Eclipse configured with the Subclipse plugin to retrieve the Cocoon source code from Subversion.
Eclipse and Subclipse
This part describes how to obtain the latest (or any) revision of the Cocoon source code from the Subversion repository from within Eclipse, using Subclipse. Note that it is not necessary to do this in order to be able to debug Cocoon using Eclipse. You can debug Cocoon without having a Subversion working copy of it. To do that, see the section Eclipse, its workspace and how to import a project (under Older Material) and Running Cocoon Jetty from within Eclipse.
Windows
The following should work on Windows. [Please verify]
(Note: Yes, it worked. But you may want to make sure the path name on the Windows box does not get too long. Otherwise you might find that the javadoc task does not work because the gerated command line is getting too long. TorstenSchlabach)
To install the Subclipse plugin:
- In Eclipse, click Help -> Software Updates -> Find and Install...
- Choose "Search for new features to install".
- Click the "New Remote Site..." button.
- Enter "Subclipse" into the name field, and "http://subclipse.tigris.org/update" into the URL field. Click OK.
- Eclipse will contact the Subclipse site for available plugins. Select "Subclipse", "Version Control with Subversion" and click Next.
- Accept the terms of the agreement, and click "Finish".
- The plugins will probably not be signed. You will get warnings. Click "Install".
- If prompted, click to restart the Eclipse workbench.
Mac OS X
The above steps didn't work on my Mac OS X 10.3 Powerbook. Instead, I needed to rollback to Subclipse version 0.9.30 (instead of 0.9.31, the latest version at the time of writing). I also needed to install the Pure Java Subversion Client Library. My steps were:
- Visit the Subclipse Archive and download site.0.9.30.zip.
- Unzip site.0.9.30.zip to my local hard drive.
- In Eclipse, click Help -> Software Updates -> Find and Install...
- Choose "Search for new features to install".
- Click the "New Local Site..." button.
- Enter "Subclipse (0.9.30 local)" into the name field, and select the folder you unzipped site.0.9.30.zip into. Click OK.
- Accept the terms of the agreement, and click "Finish".
- The plugins will probably not be signed. You will get warnings. Click "Install".
- If prompted, click to restart the Eclipse workbench.
- When Eclipse has restarted, click Help -> Software Updates -> Find and Install...
- Choose "Search for new features to install".
- Click the "New Remote Site..." button.
- Enter "Pure Java Subversion Client Library" into the name field, and "http://tmate.org/svn/" into the URL field. Click OK.
- Eclipse will contact the Subclipse site for available plugins. Select "JavaSVN Library", "JavaSVN Subclipse Extension" and click Next.
- Accept the terms of the agreement, and click "Finish".
- The plugins will probably not be signed. You will get warnings. Click "Install".
- If prompted, click to restart the Eclipse workbench.
For more information about using Subclipse on different environments, visit http://subclipse.tigris.org/.
Checking out Cocoon BRANCH_2_1_X with Subclipse
Create a new repository:
- In Eclipse, click Window -> Open Perspective -> Other...
- Choose "SVN Repository Exploring" and click OK.
- In the SVN Repository view, right-click and select New -> Repository Location...
- Enter "http://svn.apache.org/repos/asf/cocoon/" into the URL field.
- Click "Browse..." to choose "http://svn.apache.org/repos/asf/cocoon" as the Root URL.
- Leave the user and password fields blank.
- Click "Finish".
Note: Michael Straessle suggests here that SVN access from behind a firewall might be a problem. If this is the case, you should use https://svn.apache.org/repos/asf/cocoon instead (i.e. https://).
Check out the Cocoon BRANCH_2_1_X source code:
- From the SVN Repository view, expand "http://svn.apache.org/repos/asf/cocoon".
- Open the branches subfolder.
- Right-click on BRANCH_2_1_X, and choose "Check Out As...".
- Choose "Java Project from the Wizards box and click "Next".
- Enter BRANCH_2_1_X into the project name field.
- Click "Finish", and wait. Subclipse will take a long time to complete the checkout!
Note: Eclipse automatically detects source folders and adds them to your project (there is no need to run an Ant task to create an Eclipse project).
Eclipse and Ant
Building Cocoon with Eclipse's built-in Ant
To begin, we need to configure Ant to use the latest Xerces and Ant contrib JARs. We only need to do this once:
- In Eclipse, click Window -> Preferences, and choose Ant -> Runtime from the tree on the left of the dialog box.
- From within the Classpath tab, click on "Global Entries" and then click "Add JARs..."
- From your Cocoon project select tools/lib/ant-contrib-0.6.jar, lib/endorsed/xml-apis and lib/endorsed/xercesImpl-2.6.2.
- Click OK
Eclipse comes with Ant built-in. The Ant integration in Eclipse provides some nice features, such as an Eclipse view for build.xml files. Now we'll load Cocoon's Ant build file into the Eclipse Ant view:
- Make sure the Ant view is visible in your current Eclipse perspective. If not, choose Window -> Show View, and select Ant.
- Drag the build.xml from the Cocoon project root folder into the Ant view, and expand the tree. You should see many Ant targets, each marked with a green concentric circle.
To build Cocoon from within Eclipse:
- In the Ant view, double click the target you wish to build (e.g. "war", "webapp" etc.)
- Output from the build process should appear in Eclipse's Console window.
Note: All these targets (e.g. "war", "webapp" etc.) automatically invoke the init-tasks target mentioned below. There is no need to run the init-tasks target first, as described below.
Running Cocoon Jetty from within Eclipse
You can start cocoon from within Eclipse so you don't need the cli anymore. You simply configure Jetty as an application in Eclipse, build cocoon once (and the Eclipse project) and then invoke build eclipse-webapp-prepare that corrects the roles file and deletes all jars from within the WEB-INF/lib directory. That's it and you simply only use Eclipse from that point on.
Preparation:
- load Cocoon in Eclipse (see above)
Outside of Eclipse:
- build webapp
- build eclipse-webapp-prepare
Eclipse Setup:
- in the resource perspective, refresh the project
- open a Debug perspective
- launch the Run configurations wizard (Run > Run...)
- create a new Java Application Configuration for Cocoon Jetty
- give it a name ("Cocoon Jetty" for instance)
- on the 'Main' tab:
- Project: click Browse... and select the Cocoon project you loaded in Eclipse (this will load a default classpath)
- Main class: 'Loader' (without the quotes)
- Project: click Browse... and select the Cocoon project you loaded in Eclipse (this will load a default classpath)
- give it a name ("Cocoon Jetty" for instance)
-
- on the 'Classpath' tab, uncheck 'Use default class path'
- add './tools/jetty/lib/jetty-x.y.z.jar' and './tools/jetty/lib/servlet-2.3.jar' to the classpath (Add JARs...)
- add the './tools/loader/' Folder to the classpath (Advanced... > Add Folder)
- on the 'Arguments' tab set:
- Program arguments: "tools\jetty\conf\main.xml" (with quotes)
- VM arguments: "-Djava.endorsed.dirs=./lib/endorsed" "-Dwebapp=./build/webapp" -Dorg.xml.sax.parser=org.apache.xerces.parsers.SAXParser -Djetty.port=8888 -Djetty.admin.port=8889 "-Dhome=." "-Dloader.jar.repositories=./tools/jetty/lib,./lib/endorsed" -Dloader.main.class=org.mortbay.jetty.Server
- Apply
- Run
This will launch Jetty from within Eclipse and you'll see Jetty's output in the console of your debug perspective. Your application should run at http://localhost:8888/.
You can also debug Cocoon this way:
- run the Debug configurations wizard (Run > Debug...)
- select your Cocoon Jetty Java application configuration ("Cocoon Jetty" for instance)
- on the 'Source' tab, uncheck 'Use default source lookup path'
- add the './tools/src/loader/' Folder to the classpath (Advanced... > Add Folder)
- Apply
- Debug
Note: this seems to be a quite inefficient way to debug Cocoon, it is much slower than remote debugging. May be did I overlook a setting? I'd suggest running Cocoon outside of Eclipse and using remote JVM debugging. See DebuggingCocoon. Note also that to run Cocoon outside of Eclipse, you'll need to rebuild the JARs you wiped away with 'build eclipse-webapp-prepare' from the WEB-INF\lib folder, so that Cocoon debugging and running Cocoon Jetty within Eclipse seem to conflict.
I tried this. I omitted the step
- build eclipse-webapp-prepare
and it did not hurt. What is this good for?
Also I was unable to find this option:
- on the 'Classpath' tab, uncheck 'Use default class path'
so I ignored this. Did not hurt; it works anyway.
It might be worth having a look at the Tomcat plugins available for Eclipse. Maybe anything similar exists for Jetty as well.
Older Material (can it be deleted now?)
—
The stuff below may be deprecated as of 2.1.8-dev. It was definitely the way to go in 2.1.6. Maybe someone can take the time and test with 2.1.7. We should keep it around for people who need to stick to older releases for production support for a while.
Torsten Schlabach
—
The reson for that is that the Cocoon build process relies on external tasks in Ant (see: http://ant.apache.org/external.html) which are compiled on-the-fly during the Cocoon build process. So if you build Cocoon from the command line using either build.bat (Windows) or build.sh (*ix) here is what is happening internally:
- All existing ANT_HOME and CLASSPATH variables in the environment are put aside.
- A new classpath is constructed consisting of all .jar files in $COCOON_SRC/lib/endorsed. (and nothing else!)
- The Ant in the $COCOON_SRC/tools tree is called with this newly constructed classpath and the
-Djava.endorsed.dirs=lib\endorsedoption. The effect will be that Ant will run using the Xalan and Xerces implementations provided in the endorsed directory which are presumably newer and/or contain additional features over the corresponding API implemenations that come with the JDK. For more information on the "endorsed" mechanism in Java is, have a look at http://java.sun.com/j2se/1.5.0/docs/guide/standards/index.html.
One of the very first targets in the build process is the init-tasks target in the file tools/targets/init-build.xml. This target will compile the external Ant tasks
- xpatch (what is says)
- jing (RELAX NG validation)
- sitemap-components
from the sources in tools/src/anttasks to tools/anttasks and make these external tasks known to Ant using <taskdef ...>.
Other targets further down the build process rely on these tasks obviously.
Eclipse, its workspace and how to import a project
As silly as it sounds, but picking up an already existing project in Eclipse is not alway straigt forward, mostly because Eclipse offers a lot of options. Most of them are misleading for what we want to achieve here. But they are sitting on the menus ready to lead you in the wrong direction. As this is not really a in-depth Eclipse internals tutorial, let's keep a long story short.
Eclipse keeps a .metadata directory in each workspace. In there it records the projects it knows about in the workspace. Therefore just extracting the Cocoon tarball into the Eclipse workspace will not make the project show up at all.
The next logical thought then would be to use the File -> Import option and select Existing Project into Workspace. This might work somehow, but it leaves the project where it is on the file system. In other words, this is not a means to copy the extracted Cocoon source tree from a temporary location where you unpacked it into your workspace. It rather is a means of referencing a project outside the workspace. If you rely on keeping things together in your workspace(s) this is not what you want, either.
The Cocoon build.xml file provides a target to create an Eclipse project (which means it will create the .project and .classpath files that Eclipse expects) but Eclipse does not know how about this target and will not call it no matter what import mechanism you use.
So the best way to make the Cocoon source tree available in Eclise is:
- Extract the Cocoon tarball into the Eclipse workspace directory. This should create a folder $ECLIPSE_WORKSPACE/cocoon-x.y.z with the familliar Cocoon source tree structure in it.
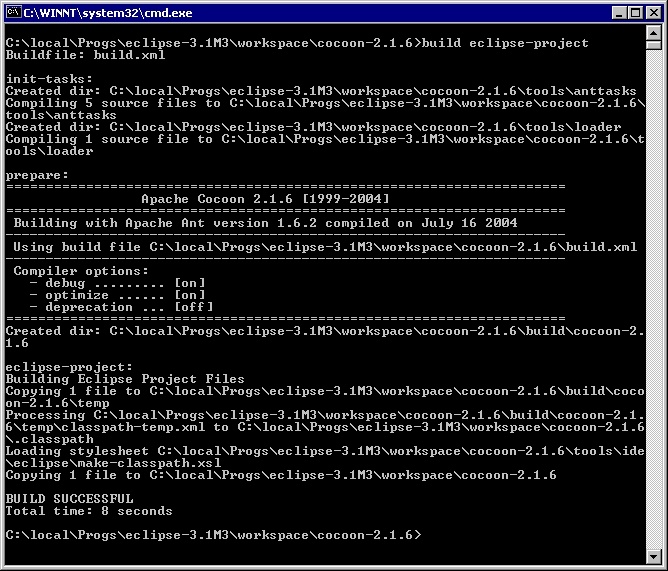
- From the command line of your os change the directory to $ECLIPSE_WORKSPACE/cocoon-x.y.z, set the JAVA_HOME environment variable if needed and run the command
build eclipse-project(Windows) or./build.sh eclipse-project(*ix). Now you have two new files: .project and .classpath. Nothing else so far.
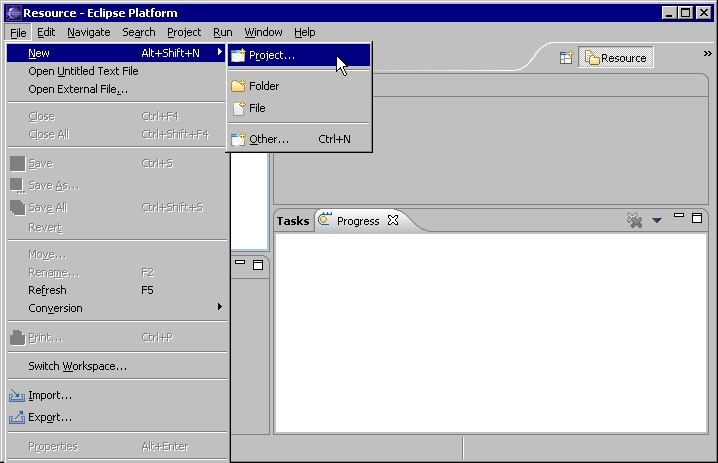
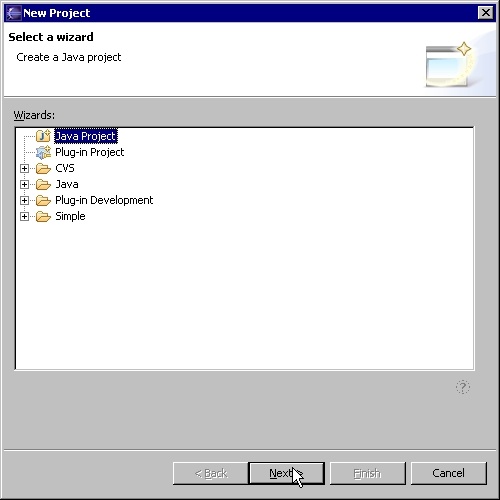
- In Eclipse, choose File -> New -> Project and select "Java Project". (This is not very logical as we already have an Eclipse Java project, don't we?)
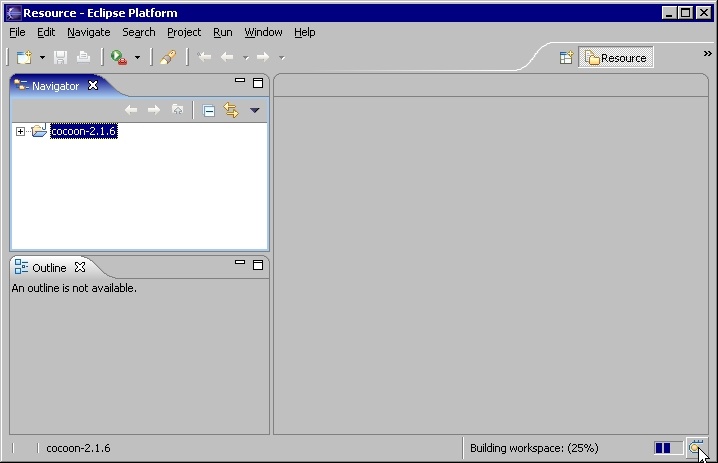
- On the dialogue that comes up, make sure the option "Create Project in Workspace" is selected and enter the project name exactly as the name of the directory, for example
cocoon-2.1.6.
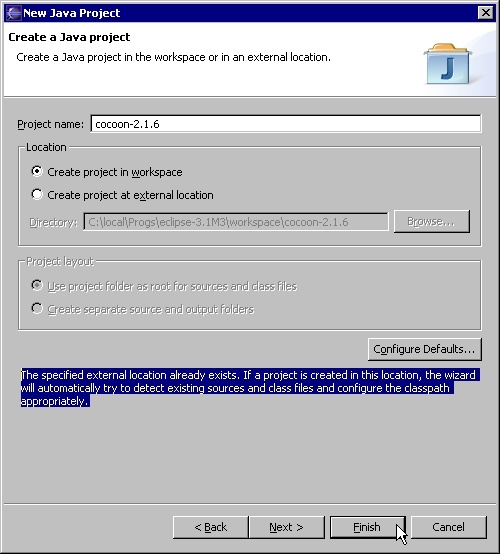
Once you do that, note the information that shows up in the bottom of the dialogue. (It will only show up if you name the project identical to the folder!) Hit finish and you are done. Cocoon is now a project in your Eclipse Workbench using the correct settings from the .classpath and .project files.
Note: Eclipse considers it a feature that the project's name in the workspace can be different from the name on the file system. You can then refer to the project name instead of the filesystem name, for example when building project dependencies. But in Cocoon land this is causing more trouble than doing any good, therefore it is recommended to keep the project's name in the workspace and the directory name on the filesystem in sync.
At this point, depending on your hardware, you might notice a lot of activity going on. This is because of Eclipse's habit to compile a .java file as soon as it sees one. This is the default setting for a new project and we did not yet have a chance to change this. So either wait for it to finish (and ignore and warnings or errors) or interrupt the build process:
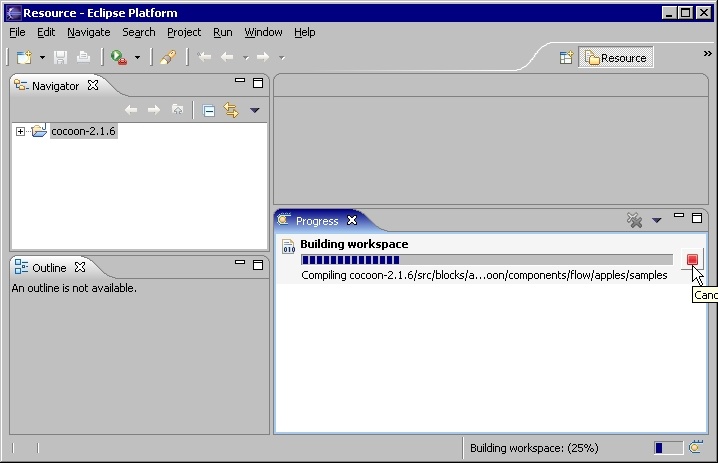
Then:
- make sure the Option Build Automatically from the Project menu is not marked.
- Chosse Project -> Clean (make sure you clean only your project and you do not run a build straight afterwards) to get rid of the classes that Eclipse just built.
Note: Wouldn't it be possible to set these settings in the .project file so the build does not even start at all?
Now you are finally ready to turn to the section about actually building Cocoon in Eclise!
Building Cocoon using Eclipse internal Ant
broken at least for Cocoon versions => 2.1.5, see section above
Here are the required steps:
- run
build eclipse-project: this creates the.projectand.classpathfiles, - launch Eclipse,
- open the "CVS repository exploring" perspective. This forces the loading of Eclipse's CVS plugin that will prevent the IDE being confused by CVS files present in your filesystem,
- create a new Java project in Eclipse,
- give it any name you want ("Cocoon" is a good choice !)
- uncheck "use default" and browse to the location of your Cocoon checkout
- click "Finish", wait a little bit and enjoy!
For using CVS functionality provided by Eclipse you must do additional steps:
- right click on the project icon, choose "Team" and "Share Project"
- You might get a message about the currently-existing CVS directories, which is good. Click through and Eclipse will think a little more.
- To perform CVS operations on files, right click on the file in Eclipse, and choose "Team". You should see Commit, Update, etc.
To run the Ant build from within Eclipse you have to add something like this to the build.xml:
  <!-- =========================================================== -->
  <!-- Use the Eclipse compiler if we are running in eclipse       -->
  <!-- =========================================================== -->

  <target name="properties" if="eclipse.running">
    <property name="build.compiler" value="org.eclipse.jdt.core.JDTCompilerAdapter"/>
  </target>
Note: Cocoon build system uses Ant 1.6, so calling the Ant build from an older Eclipse without Ant 1.6 does not work. You need a recent 3.0 milestone build of Eclipse - or you know how to replace your Ant version in your older Eclipse.
^^^^ I don't know where I should put that. ^^^^
I discovered one problem with IBM's WSAD under Linux. In the .project file the <name>project-name</name> should be the same as the path. For instance:
- <name>cocoon-2.1m3</name>
- /pathtoworkspace/cocoon-2.1m3
Does this maybe relate to the section "Eclipse, its workspace ..."? Then it would on only be applicable to WSAD but any flavour of Eclipse.
Building Cocoon in Eclipse using Cocoon's packaged Ant
Note: This is kind of a workaround and it has not yet been fully researched what implications this approach has on the Eclipse way of doing things (especially on-the-fly compiling, automatic reloading of web applications what using a Tomcat plugin and the like). In fact what is described here is little more than a more convenient way of just browsing and editing the Cocoon source tree in Eclipse but keeping a command line window open to trigger the build from there. One important feature of this "external tools" approach is that Eclipse will do a refresh of the project after a build - if you don't forget to configure it!
We assume $ECLIPSE_WORKSPACE is your Eclipse workspace here.
Here are the required steps:
- Import the Cocoon project into your workspace according to the section Eclipse, its workspace and how to import a project
- Go to the External Tools dialogue by clicking on the External Tools button (it's a right pointing triangle on a green circle with a red tool case)
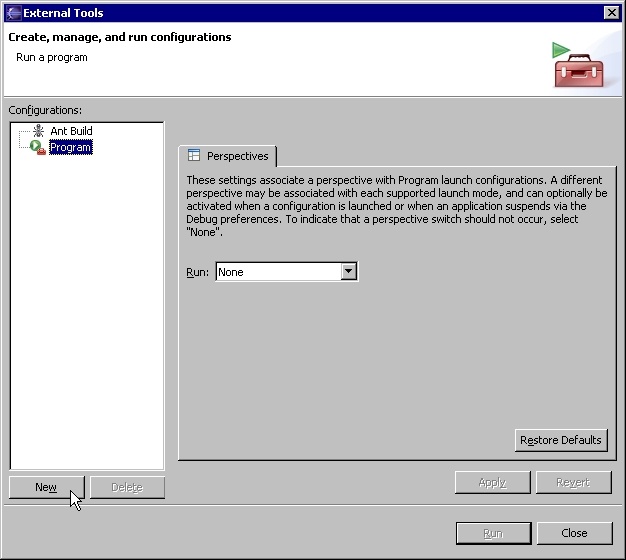
- Click on Program (not: Ant build -> this would mean the internal Ant which cannot do the job!) and New.
- Give your external tool a name such as Build Cocoon and use the Browse button to choose the build.bat or build.sh file and set the working directory to the Cocoon source directory.
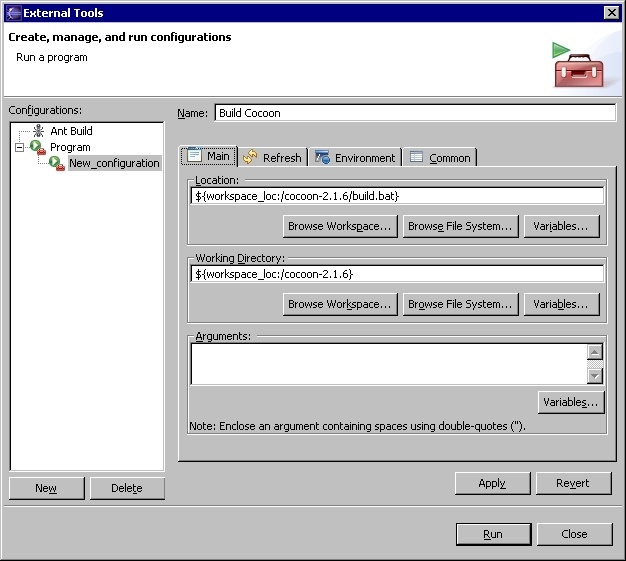
- Turn over to the Refresh tab and make sure you configure Eclipse to do a refresh of its view of the source (and binary) tree after the build.
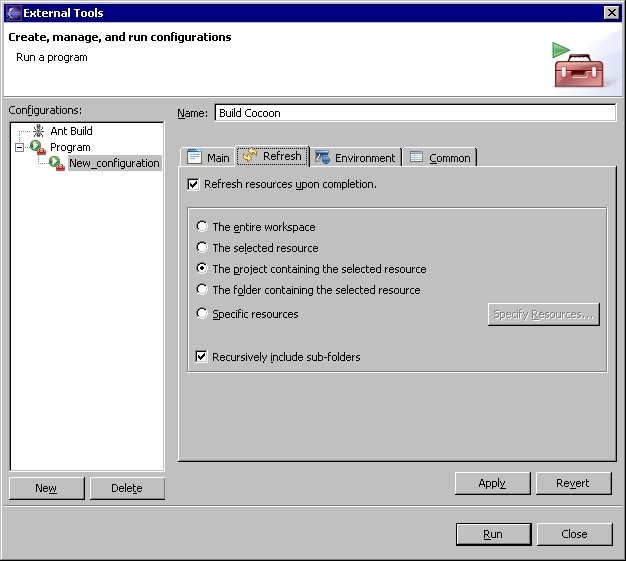
Note: This again is something very eclipsy: Probably for performance reasons Eclipse has a very strong caching of file system contents and is heavily relying on the assumption that during development all changes to the file system will happen through the Eclipse workbench itself, either by the user editing or the compiler building any output files. As the external Ant build breaks this assumption the refresh is needed to make sure Eclipse is in synch again after the build.