...
This example assumes that the LDAP Server is installed in your Local machine.
| Anchor | ||||
|---|---|---|---|---|
|
Adding Users
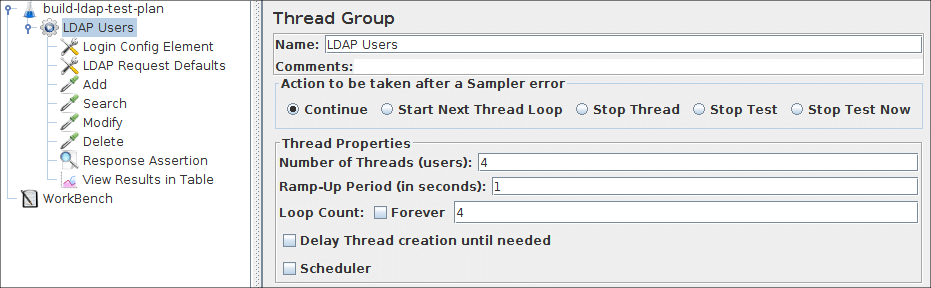
The first step you want to do with every JMeter Test Plan is to add a Thread Group element. The Thread Group tells JMeter the number of users you want to simulate, how often the users should send requests, and the how many requests they should send.unmigrated-wiki-markup
Go ahead and add the \[wiki:Self:UserManual/Reference/ThreadGroup: ThreadGroup\] element by first selecting the Test Plan, clicking your right mouse button to get the Add menu, and then select Add-\->\[wiki:Self:UserManual/Reference/ThreadGroup: ThreadGroup\]. You should now see the Thread Group element under Test Plan. If you do not see the element, then "expand" the Test Plan tree by clicking on the Test Plan element.
http://jakarta.apache.org/jmeter/images/screenshots/ldaptest/threadgroup.png BR
Figure 9.1. Thread Group with Default Values
| Anchor | ||||
|---|---|---|---|---|
|
Adding Login Config Element
...
Like most JMeter elements, the Login Config Element Control Panel has a name field that you can modify. In this example, leave this field with the default value.
http://jakarta.apache.org/jmeter/images/screenshots/ldaptest/login-config-element.png BR
Figure 9.2 Login Config Element for our Test Plan
| No Format |
|---|
Enter Username field to "your Server Username",[[BR]] The password field to "your Server Passowrd" These values are default for the LDAP Requests. |
| Anchor | ||||
|---|---|---|---|---|
|
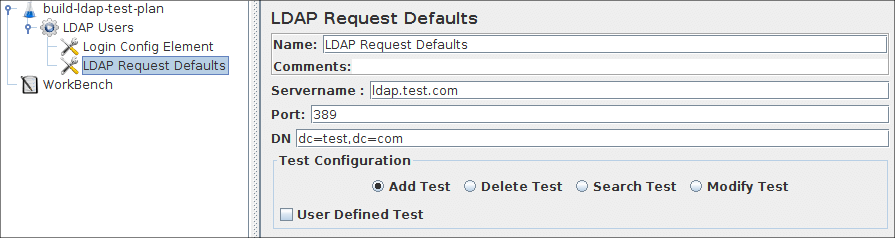
Adding LDAP Request Defaults
...
Like most JMeter elements, the LDAP Request Defaults Control Panel has a name field that you can modify. In this example, leave this field with the default value.
http://jakarta.apache.org/jmeter/images/screenshots/ldaptest/requestdefaults.png BR
Figure 9.3 LDAP Defaults for our Test Plan
| No Format |
|---|
Enter DN field to "your Server Root Dn".[[BR]] Enter LDAP Server's Servername field to "localhost".[[BR]] The port to 389.[[BR]] These values are default for the LDAP Requests. |
| Anchor | ||||
|---|---|---|---|---|
|
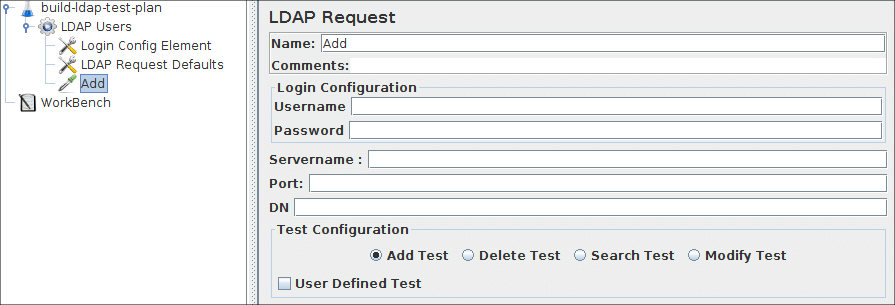
Adding LDAP Requests
In our Test Plan, we need to make four LDAP requests.
...
- Change the Name to "Inbuilt-Add Test".
- Select the Add test Radio button
http://jakarta.apache.org/jmeter/images/screenshots/ldaptest/add.pngBR
Figure 9.4.1 LDAP Request for Inbuilt Add test
You do not have to set the Server Name field, port field, Username, Password and DN because you already specified this value in the Login Config Element and LDAP Request Defaults.
...
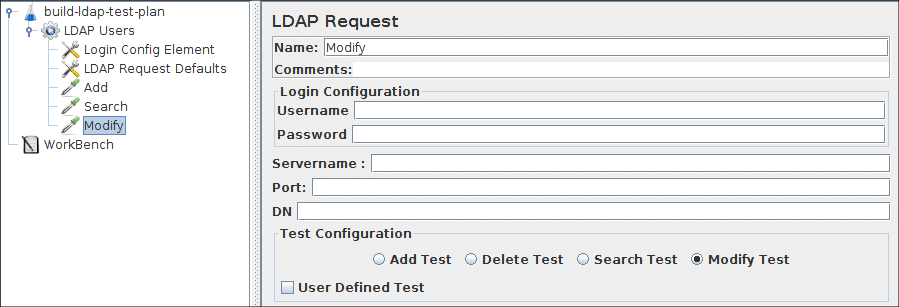
- Change the Name to "Inbuilt-Modify Test".
- Select the Modify test Radio button
http://jakarta.apache.org/jmeter/images/screenshots/ldaptest/modify.pngBR
Figure 9.4.2 LDAP Request for Inbuilt Modify test
- Change the Name to "Inbuilt-Delete Test".
- Select the Delete test Radio button
http://jakarta.apache.org/jmeter/images/screenshots/ldaptest/delete.pngBR
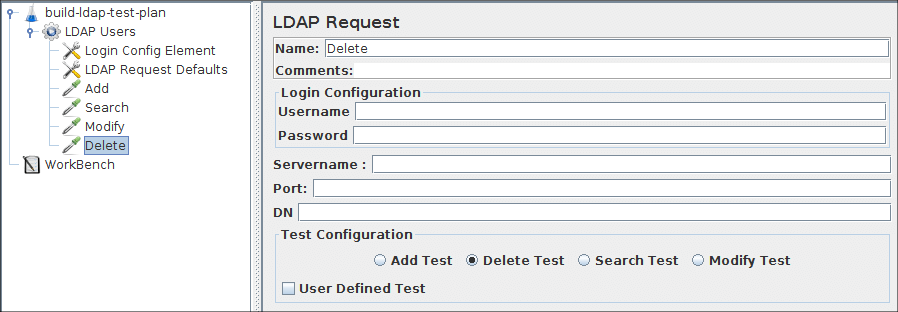
Figure 9.4.3 LDAP Request for Inbuilt Delete test
- Change the Name to "Inbuilt-Search Test".
- Select the Search test Radio button
http://jakarta.apache.org/jmeter/images/screenshots/ldaptest/search.pngBR
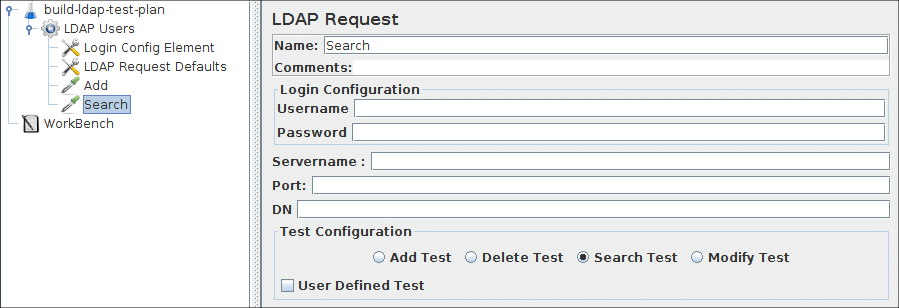
Figure 9.4.4 LDAP Request for Inbuilt Search test
| Anchor | ||||
|---|---|---|---|---|
|
Adding a Listener to View/Store the Test Results
The final element you need to add to your Test Plan is a Listener. This element is responsible for storing all of the results of your LDAP requests in a file and presenting a visual model of the data.Select the Siptech Users element and add a View Results in Table (Add --> Listener -->View Results in Table)
http://jakarta.apache.org/jmeter/images/screenshots/ldaptest/viewtable.png BR
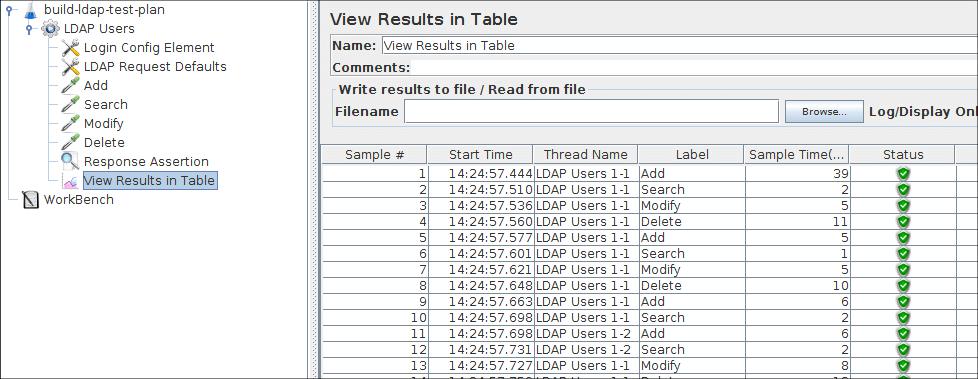
Figure 9.5 View result in Table Listener
| Anchor | ||||
|---|---|---|---|---|
|
Saving the Test Plan
Although it is not required, we recommend that you save the Test Plan to a file before running it. To save the Test Plan, select Save Test Plan from the File menu (with the latest release, it is no longer necessary to select the Test Plan element first).
| No Format |
|---|
JMeter allows you to save the entire Test Plan tree or only a portion of it. To save only the elements located in a particular "branch" of the Test Plan tree, select the Test Plan element in the tree from which to start the "branch", and then click your right mouse button to access the Save As menu item. Alternatively, select the appropriate Test Plan element and then select Save As from the Edit menu. |
| Anchor | ||||
|---|---|---|---|---|
|
Running the Test Plan
From the Run menu, select Run.
...