Clustering and High Availability in Servicemix
ServiceMix supports both High availability(HA) and clustering of containers. As you can configure HA without clustering its helpful to deal with them as two separate tasks.
High Availability in ServiceMix
Within the scope of this document, high availability (HA) can be defined as two distinct ServiceMix container instances configured in a master/slave configuration. In ALL cases, the master is ACTIVE and the slave is in STANDBY mode waiting for a failover event to trigger it to take over.
Some Definitions...
ACTIVE - components are listening for and servicing requests
STANDBY - administrative ports may be open (e.g. JMX) but the process is not listening for or servicing requests
As ServiceMix leverages ActiveMQ to provide HA functionality, there are a few choices in terms of how to configure master/slave via ActiveMQ:
- Shared Filesystem Master-Slave - With shared database master/slave two containers use the same physical data store for container state. Care should be taken to ensure that the file system supports file level locking as this is the mechanism used to elect the master. If the master process exits, the database lock is released and the slave acquires it and it then becomes the master.
- JDBC Master-Slave - In JDBC master/slave, the master will lock a table in the backend database. The failover event in this case is that the lock is released from the database.
- Pure Master-Slave - With pure master/slave either a shared database or a shared filesystem can be used. The master replicates all state changes to the slave so there is additional overhead incurred. The failover trigger in pure master/slave is that the slave loses its network connection to its master. Due to the additional overhead and maintenance involved, options 1) and 2) above are more desirable.
(See An Introduction to ActiveMQ Master/Slave for more information)
Clustering in ServiceMix
Within the scope of this document, a cluster can be defined as two or more ACTIVE ServiceMix container instances that are networked together. A cluster provides the following benefits:
- Connectivity to other ServiceMix containers forming a network of containers. Containers can be dynamically added and removed from the network.
- Remote component awareness where each container is aware of its peer container's components. Networked containers listen for remote component registration/deregistration events and once aware can route requests to those components.
- Load balancing where a cluster provides the ability to balance requests in a couple of ways including:
- Installation of the same component on multiple containers to provide increased capacity and additional HA capabilities. If one container fails the same component in another container can still service the request.
- Partition workload among container instances whereby different containers can handle different tasks and flows can span multiple containers.
Example: Configuring HA
When learning about ServiceMix HA configuration, a good starting point is to configure HA on a single host. In this scenario lets assume we have container1_host1(master) and container2_host1(slave).
To configure our example using a shared filesystem master/slave", the steps involved including the following:
1) Install two ServiceMix instances (servicemix1 & servicemix2).
2) Ensure <servicemix2> is an exact replica of <servicemix1>. The exact same files should be installed in the <servicemix2>/hotdeploy directory and <servicemix2>/conf.
3) Edit the <servicemix1>/conf/activemq.xml file and configure the ActiveMQ peristence adapter:
  <!-- We use 0.0.0.0 per AMQ-2094 -->
  <amq:transportConnectors>
     <amq:transportConnector uri="tcp://0.0.0.0:61616"/>
  </amq:transportConnectors>

  <amq:persistenceAdapter>
      <amq:amqPersistenceAdapter directory="file:<shared>/data/amq"/>
  </amq:persistenceAdapter>
4) Edit <servicemix2>/conf/activemq.xml and verify the ActiveMQ peristence adapter configuration.
  <amq:transportConnectors>
     <amq:transportConnector uri="tcp://0.0.0.0:61616"/>
  </amq:transportConnectors>

  <amq:persistenceAdapter>
      <amq:amqPersistenceAdapter directory="file:<shared>/data/amq"/>
  </amq:persistenceAdapter>
Please Note
- Both configurations use the exact same
dataDirectory.
- Both configurations use the exact same
transportConnectorconfiguration. There will NOT be a port conflict as the slaves {{TransportConnector}}s will not be activated until a failover event occurs.
- This example is for a shared filesystem master/slave. For shared JDBC master/slave you would modify the persistence adapter so that both instances point to the same
dataSource, for example:
<amq:persistenceAdapter>
      <amq:jdbcPersistenceAdapter dataSource="#oracle-ds" />
</amq:persistenceAdapter>

<bean id="oracle-ds" class="org.apache.commons.dbcp.BasicDataSource" destroy-method="close">
 	 <property name="driverClassName" value="oracle.jdbc.driver.OracleDriver" />
  <property name="url" value="jdbc:oracle:thin:@192.168.1.4:1521:mydbname" />
  <property name="username" value="smix_node1_ha" />
  <property name="password" value="smix_node1_ha" />
  <property name="poolPreparedStatements" value="true" />
</bean>
- With ServiceMix 4, you will be able to use SERVICEMIX_BASE to specify the
<servicemix>/confdirectory so two installs will not be necessary.
5) When using the same host you MAY need to change the JMX ports to avoid port conflicts by editing <servicemix2>/conf/servicemix.properties file to change the rmi.port.
rmi.port = 1098
rmi.host = localhost
jmx.url = service:jmx:rmi:///jndi/rmi://${rmi.host}:${rmi.port}/jmxrmi
How to Test the Configuration
Below are the steps to testing the configuration:
1) Start a ServiceMix instance by running ServiceMix in the root of the install directory.
servicemix1_home $ ./bin/servicemix
As this instance is started first it acquires a lock on the persistent store and becomes the master
2) Start the slave container
servicemix2_home $ ./bin/servicemix
You should see that the startup for the slave is different to the master. It waits to acquire a lock on the shared database.
3) Ctrl-c the master instance. You should see the slave fail over.
This configuration has some advantages and some disadvantages:
Advantages:
1) You don't need to configure a failover URL for your clients
Disadvantages:
1) Not resilient to a hardware failure unless you are using a third party clustering software.
Extending the HA Example to Separate Hosts
This example can be extended such that the master and slave are on separate hosts. Both the shared filesystem master/slave and the JDBC master/slave approaches still have the requirement that both instances access the SAME presistent store. With shared filesystem master/slave, this can be provided via a SAN and for JDBC master/slave both instances need to be able to access the same database instance.
You pay for this flexibility with additional configuration overhead. Specifically you may need to introduce failover URLs into your deployed component configurations.
Example:
failover://(tcp://host_servicemix1:61616,tcp://host_servicemix2:61616)?initialReconnectDelay=100
You may also need to provide your clients with both HA host addresses (or insulate clients from this details via a hardware load balancer). Clients need to be aware that only one instance will be ACTIVE at a time.
See the ActiveMQ Failover Transport Reference for more details on failover URLs.
Clustering Configuration
To create a network of ServiceMix containers, you need to establish network connections between each of the containers in the network. So if we extend the HA example above and add two more container processes such that we have:
smix1_host1(master) and smix2_host1(slave)
smix1_host2(master) and smix2_host2(slave)
Then we need to establish a network connection between the two active containers (namely smix1_host1 and smix1_host2).
As Servicemix leverages ActiveMQ to provide clustering functionality, you have a few choices in terms of how you configure the *NetworkConnector*s:
1) Static Network Connectors
With a static configuration, each NetworkConnector in the cluster is wired up explicitly via
<servicemix>/conf/activemq.xml.
Here's an example of a static discovery configuration:
<!-- We are setting our brokerName to be unique for this container -->
<amq:broker id="broker" brokerName="host1_broker1" depends-on="jmxServer">

   ....

   <networkConnectors>
      <networkConnector name="host1_to_host2" uri="static://(tcp://host2:61616)"/>

      <!-- Here's what it would like for a three container network -->
      <!-- (Note its not necessary to list our own hostname in the uri list) -->
      <!-- networkConnector name="host1_to_host2_host3" uri="static://(tcp://host2:61616,tcp://host3:61616)"/ -->

   </networkConnectors>

</amq:broker>
Cluster Configuration Conventions
- Don't use static and multicast at the same time. If you enable static {{networkConnector}}s then disable multicast and vice versa.
- When using a network of containers in
<servicemix>/activemq.xmlensure that thebrokerNameattribute is unique for each node in the cluster. This is to ensure that the instances in the network can uniquely identify each other.
- Ensure the jbi container name configured in
<servicemix>/servicemix.xmlis unique to the cluster.
- If you are also using a HA configuration then the
brokerNameattribute should be the same for both the master and the slave.
- When configuring a network of containers you need to to ensure that you have a unique persistent stores for each ACTIVE instance. If you are using a JDBC datasource, this means a separate database for each ACTIVE instance.
<property name="url" value="jdbc:mysql://localhost/broker_activemq_host1?relaxAutoCommit=true"/>
- It is possible to setup a network of containers on the same host. You will need to change the JMS ports and
transportConnectorports to avoid port conflicts.
Edit the <servicemix>/conf/servicemix.properties, changing the rmi.port and activemq.port as appropriate.
rmi.port                   = 1098
rmi.host                   = localhost
jmx.url                    = service:jmx:rmi:///jndi/rmi://${rmi.host}:${rmi.port}/jmxrmi

activemq.port              = 61616
activemq.host              = localhost
activemq.url               = tcp://${activemq.host}:${activemq.port}
2) Multicast
If you have multicast enabled on your network and you have multicast configured in the <servicemix>/conf/activemq.xml, then when the two containers are started they should detect each other and transparently connect to one another.
Here's an example of a multicast discovery configuration:
<networkConnectors>
  <!-- by default just auto discover the other brokers -->
  <networkConnector name="default-nc" uri="multicast://default"/>
</networkConnectors>
Notes
- If you are also configuring HA, the standby processes should not be affected as they are not actively listening for connections.
- Once a network connection has been established, each container will discover the other containers remote components and can route using a JMS flow (or if transactions are required around each component a JCA flow) to the remote components.
- It is not uncommon for multicast to be disabled. In that case you can configure static network connectors instead.
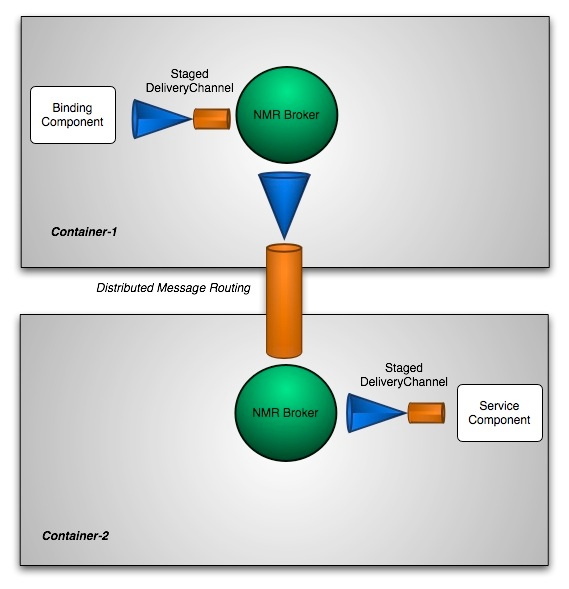
Diagram
Below is an example of a remote flow in a clustered configuration.
1 Comment
daren isaacs
Please add a note under 'Cluster Configuration Conventions':
Ensure the jbi container name configured in <servicemix>/servicemix.xml is unique to the cluster.