Cocoon 3 Profiling
- COCOON-RELEASES: 3
- DOCUMENT-STATUS: *draft*
What this page is about
This page was created to document a student project at [Vienna University of Technology|http://www.tuwien.ac.at/]. The aim is to develop a cocoon profiling module for cocoon 3 (further details see [Cocoon 3 Profiling|http://cocoon.apache.org/3.0/student-project-ideas/cocoon3-profiling.html]).
List of participating students:
- Michael Handler
- Christoph Leiter
- Benedict Leskovar
- Andreas Pinter
- Sebastian Rosensteiner
- Stephan Teuschl
Current Status
A first Patch (introducing the cocoon-profiling project to cocoon 3) was already applied. Currently we are discussing the second patch which is available here: [http://christophleiter.com/tmp/cocoon-profiling-1.patch].
We are about to build a suitable data structure for the profiling data, and we are now facing the problem that some of the data we store is redundant. This is because some of our aspects are very generic and intercept calls of the same object (e.g. a PipelineComponent) several times, storing the same information in several ProfilingData objects. I see no way to make the aspects more specific, since we have no information which servlets, sitemaps and pipeline components might be used and which methods are called.
Measuring the runtime of servlets, sitemaps and pipeline components is now done at a method basis, which means that we have accurate data on the runtime of the intercepted methods, but no data on the runtime (lifetime) of a specific servlet or pipeline component.
HOWTO use cocoon-profiling and firebug!
This is a small HOWTO which should help you to get Cocoon 3 Profiling up and running.
Profiling
In order to use cocoon-profiling, you simply have to include the cocoon-profiling jar in your classpath. Cocoon-profiling uses Spring AOP, so no further configuration is needed.
How do I get cocoon-profiling?
Currently, you have to checkout cocoon 3 and apply this patch: [http://christophleiter.com/tmp/cocoon-profiling-1.patch]. Then simply build cocoon (using mvn install) and add cocoon-profiling as a dependency in your application or add cocoon-profiling-3.0.0-alpha-2-SNAPSHOT.jar to your classpath.
I cannot / do not want to use Firebug. Can I use cocoon-profiling anyway?
Of course. Cocoon-profiling provides several generator for xml and graphical output, which is used by the Firebug plugin. However, you can directly access the data using
- yourdomain.com/controller/profiling/{id} for the xml file (xml schema: profilingSchema.xsd)
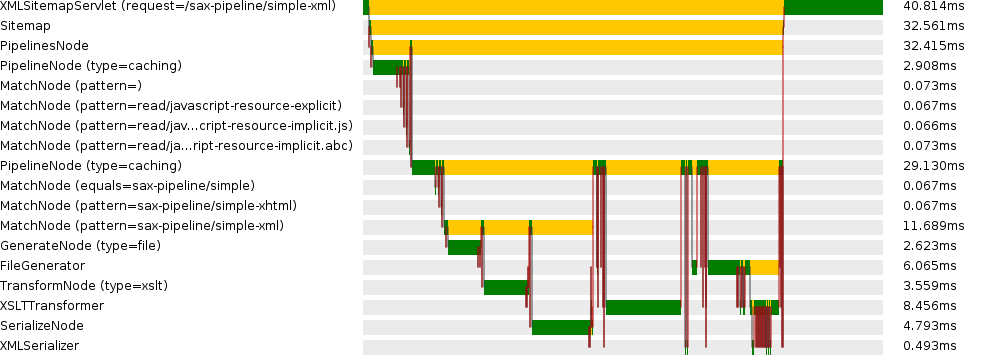
- yourdomain.com/controller/profiling/{id}.png for the graphical representation (example see below)
where {id} is the id of the request. This id (X-Cocoon-Profiling-ID) can be found in the header of the original request.
This is an example for the graphical representation:
How can I enable/disable cocoon-profiling on the fly?
Cocoon-profiling is enabled per default. If you just want to use it, you can skip this chapter.
If you want to start or stop profiling while the server is running, you can use the management bean provided by cocoon-profiling. Cocoon-monitoring automatically exposes this MBean; just make sure that cocoon-monitoring is in your classpath. You can then connect to the server process using jconsole and call the "start" and "stop" method of the org.apache.cocoon.profiling MBean.
Keep in mind that cocoon-profiling uses Spring AOP to intercept method calls, which cannot be enabled or disabled at runtime. Therefore, a disabled cocoon-profiling still affects the performance (at least a little bit). Only removing cocoon-profiling from the classpath and restarting the server guarantees maximum performance.
I need cocoon-profiling to profile my custom cocoon component, how can I do that?
Generally, you don't have to change anything. Cocoon-profiling uses Spring AOP to profile all cocoon components and servlets as well as any subclass or cocoon interface implementation.
Advanced users might want to add their own Profiler class to cocoon-profiling if they have a specific component with specific parameters or other bits of data they want cocoon-profiling to collect.
Firebug
Getting the Firebug Plugin able to work is really easy. You'll need to install Firebug 1.4X [http://getfirebug.com/releases/firebug/1.4X] and then install the Firebug .xpi from cocoon-profiling-firebug (opening it with Firefox should suffice). The .xpi will only be available after the next content patch from cocoon-profiling, so you might have to wait a few days (as of June 1st, 09). Afterwards, you should have a little bug on the bottom right corner of your Firefox. Clicking will open it, then you can navigate to the net-panel (you might want to be sure its activated) and there open up a request (you might need to refresh). In the request, there should be a tab called "Cocoon 3 Profiling", if you click it, and the Profiling Service works, you should now see the generated profiling data.
The data itself is presented in two textboxes. The left one is the tree which resembles the .xml that the profiling-component generates, the right one displays the elements, properties, return-values and the profiler of a given (= selected) row in the left tree. You can navigate through the left tree, and based on which row you currently have selected, the right textbox will display the names and values. To add some visual help, pictures are being displayed, based on which kind of element is displayed.
The underline is:
 - Argument
  - Component
  - Exception
  - Invocation
  - Node
  - Profiler
  - Property
  - Return-Value
  - Servlet
  - Sitemap
You also have two options which can change what you'll be able to see in the Firebug Plugin. These are located on the net Tab Option Panel, which is a little triangle. The options are marked {c3p} and allow you to Show / Hide the Sitemap and to change if the invocations element of the tree is closed or opened. These changes will require a reload, either by reloading your browser, or by clicking the "Reload"-Button in the Profiling Panel.
The other button on the panel will open a new tab in your Firefox in which a graphical outline will be shown which lists your components and the execution time of each of these components. Be aware, though, that the first profiling cycle will present you a kind of wrong picture (it takes a lot longer), because of the java-intern class-loading and other administrative stuff. You'll need to reload the request, not the picture, to change this.
Customizing your Firebug Plugin
To customize your Firebug Plugin, go to the plugin folder in your Firefox, select the Profiling plugin, then navigate to chrome\skin\classic\cocoon3profiling.css. In this css, you can change the heigth and width of the trees and of their columns. Simply navigate to the element you want to change, and change the value in there.
First Examples
The following examples were developed to gain knowledge about the cocoon project and other related technologies (e.g. Spring AOP). Beginners might find these resources useful since these examples are simple and easy to use.
Spring AOP
This project contains a small Spring example including a few aspects (using annotation syntax) which shows the use of spring containers and how to use AOP within Spring. The aspects in this project show how to create and use advices and give an idea of the possiblities Spring AOP has to offer.
A simple ThreadLocal example was added to show how threads can be identified from each other.
Cocoon Sequence Diagram
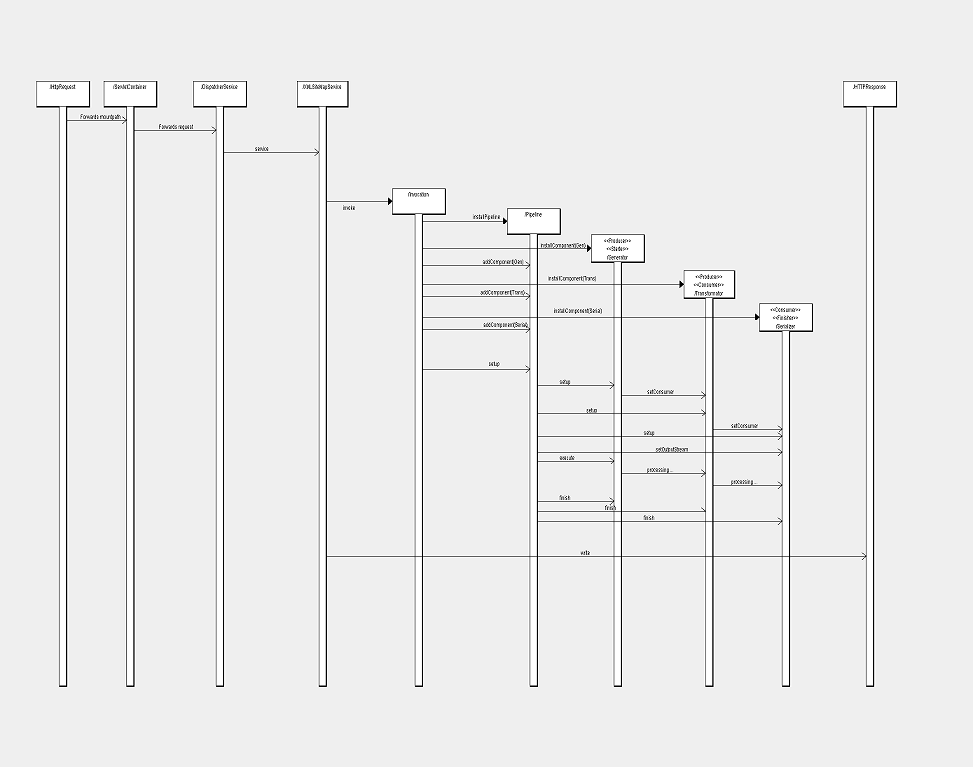
There are three big parts of the cocoon workflow: the servlet, the sitemap, and the pipeline. In the following, these parts will be showed - and described - to you, splitting the big diagram in logical parts where the interfaces are. In reality, those work together rather smoothly, so it is just about abstraction and a simpler view of the big picture that they are splitted in this view.
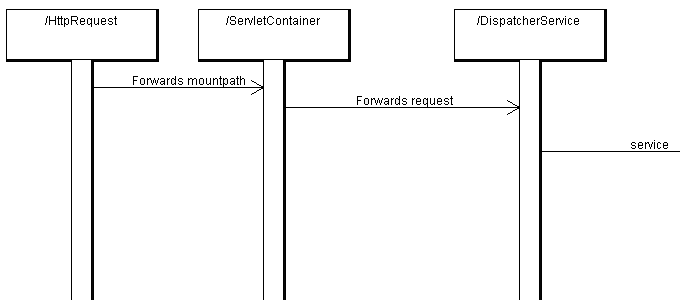
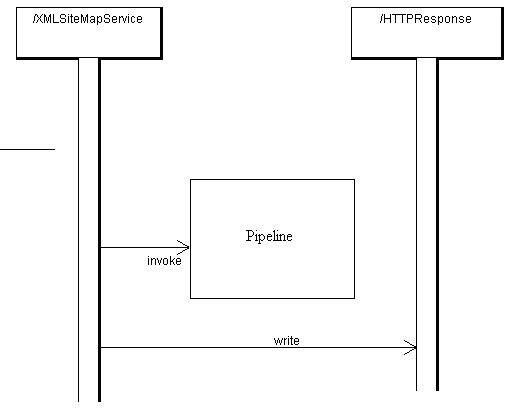
First, there is the servlet-part. It contains the HTTPRequest, the ServletContainer, the DispatcherService and the XMLSitemapService. The structure is rather straightforward: The HTTPRequest recieves a request (a mountpath like (/foo) and then forwards it to the ServletContainer. The ServletContainer knows of only one service, the DispatcherService, so it forwards the request to the DispatcherService. The DispatcherService then chooses the fitting Servlet for this request based on the mountpath and forwards the service-request to the corresponding XMLSiteMapSerivce, which is the beginning of our second block.
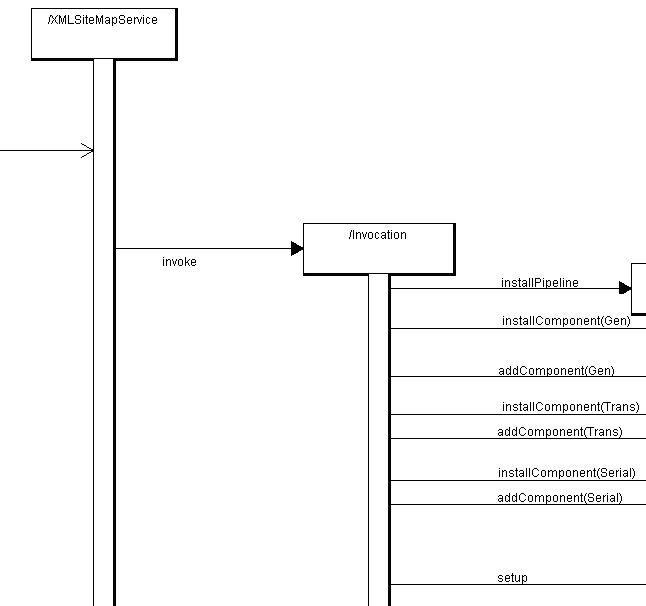
Our XMLSiteMapService first initializes itself by parsing its own Sitemap (using a SAXParser) and, based on that, builds its own structure in java. It then invokes the Invocation, which basically belongs to the XMLSiteMapService 'block' but does a bunch of work, so its gotten an extra part. The Invocation recieved the structure of the SiteMap by the XMLSiteMapService, and so knows what kind of pipeline to build (basically, it does nothing more and nothing less). As you can see in the illustration, it first installs a pipeline, thus creating the process and then creating the single components and adding it to the pipeline. When the installing is done, the Invocation executes, thus starting the setup of the pipeline and bringing us to our third block. After the whole third block has been processed, the XMLSiteMapService recieves the OutputString as a result and writes it to the HTTPResponse, completing the request.
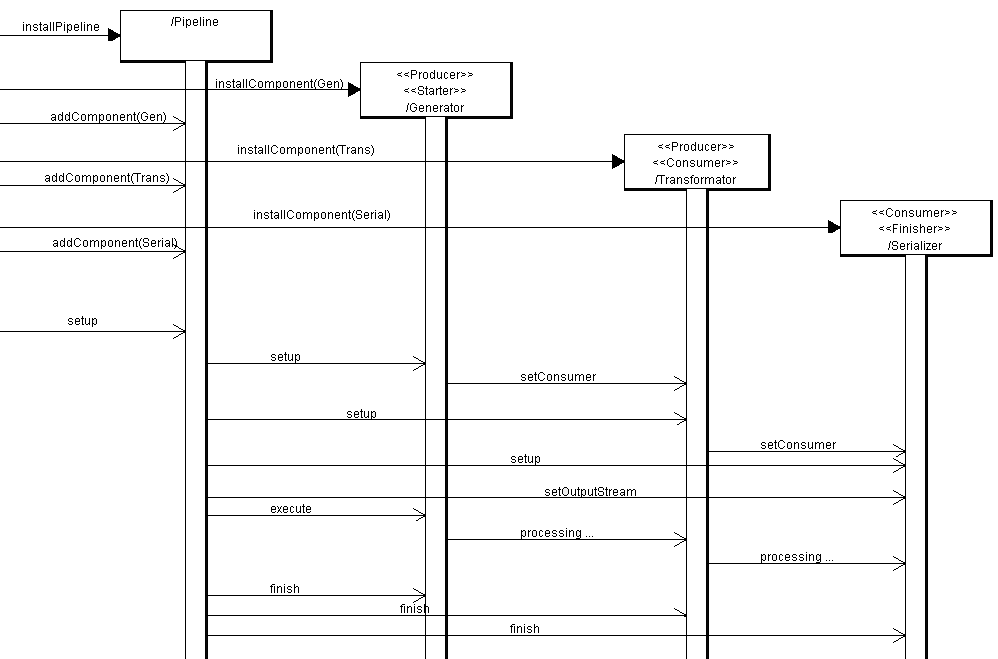
The third block is the heart and soul of cocoon. All the prerequisites have been fulfilled and the pipeline has been set up. It can now start its work and does so by calling a setup method of its components (which have been added by the Invocation). During the setup phase, a component can do specific things that have to be set up before the pipeline is executed, these are certain parameters, which can be set before, and the method setConsumer, which 'sticks' the pipeline-components together.
The pipeline consists of PipelineComponents, like the Generator and the Serializer. There are many different Implementations of these, based on your needs. The PipelineComponents can implement a Producer and/or Consumer, meaning that they either consume and/or produce data. They can also be Starters or Finishers. Every pipeline needs a Starter and a Finisher in order to work properly. The Starter is normally a Producer, the Finisher a Consumer, all the other parts in the middle consist of Components that are Producers and Consumers. The example in the illustration shows such a case, where the Transformer is a Consumer of the Generator, but a Producer for the Serializer. It is important to understand that a pipeline can be of virtually any length, so long as every Consumer is compatible to its preceding Producer.
The first part of the pipeline, the Starter, "mounts" the input of the next component to its own output. The next part does the same, and so on. Every component knows what to do on its own, so the Finisher (the last part of the pipeline, which produces the output) wouldn't try to set another consumer. After this is done, the pipeline set the OutputStream on the Finisher and then executes, starting the processing.
The pipeline just has to start the Starter, which, after dealing with his work, will then forward the data to its consumer, and so on. Afterwards, the pipeline gives every component a chance to finish their processing. Because of the nature of java and the OutputStream (the actual object just gets passed around until the end), at the end the Finisher will have filled the object with the output and the XMLSiteMapService can now write the output to the HTTPResponse object and fulfill the request (as seen in a strongly simplified way on the next illustration).
Cocoon Sample
A small cocoon sample was developed in order to get a better understanding of cocoon and its possibilities.